
Do-it-yourself dorm decor
Finally, a place to call your own.
Too bad its cinderblock walls and fluorescent lighting are more reminiscent of a jail cell – and not some socialite’s, either – than a palatial escape from the stresses of classes, exams and the opposite sex. That doesn’t mean your dorm room has to remain in its dreary state, though, even if you’re not a budding Martha Stewart. Let’s start by picking out a color scheme and tackling the most ambitious project – adorning the walls.
Pick a color, any color
The trick to determining a room’s color palette is to pick out your comforter first. Let’s face it: in a 10-square-foot room, your bed’s bound to be the focal point, so let its main color become the primary hue of your room – as long as it doesn’t clash with the roommate’s, of course – and let the comforter’s two minor colors serve as your accents.
If your comforter is a solid color, or if you and your roommate have differing color preferences, let the color wheel be your guide. For a bold, dramatic look, opt for complementary hues – two colors that are opposite each other on the color wheel, such as yellow and violet. If your comforter is red and your roommate’s is pink, choose analogous colors on the wheel to decorate your room. These would be the three colors neighboring each other on the wheel, and in this case would be ‘warm’ hues. Or, if you both have varying shades of the same color, go for a monochromatic look by dressing the room in variations of that hue. Once your colors are chosen, the transformation can begin.
To paint or not to paint
That barren expanse of eggshell-colored walls, which, of course, has been painted just the perfect shade of not-quite-white so that it’s nearly impossible to match when it comes time to move out, is the first thing that needs to go. Considering the hassle painting involves, however, maybe you’re better off not painting at all. If you insist, though, you can buy a gallon of some picky soul’s orphaned paint at Lowe’s or Home Depot for roughly the cost of a Venti Starbucks latte. Just look for the “Oops” paint, and try painting only one wall for a high-impact look. Talk with your complex manager or RA before unleashing that paint roller to make sure that the color change is allowed.
Clothe your naked walls
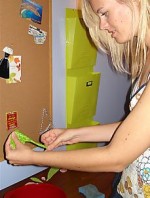
If you’re after something a little more eclectic, scour the clearance fabric bins at Wal-Mart for a few yards of coordinating fabric, then cut out flowers, birds, polka dots or whatever you’re into and adhere them onto the wall using liquid starch. Starch can be found in the bleach/detergent aisle. (For inspiration, check out an Urban Outfitters catalog. If freehand cutting your own designs is too intimidating, print out a pre-designed stencil from Stencilry.org.)
Dip the pre-cut fabric in a bowl of liquid starch. Use your fingers to squeegee the excess out, and apply it to the wall. Remove any remaining starch residue using a sponge and water. The best part is that if you mess up or decide to change your look, all you have to do is peel it off. No mess, no repainting. A how-to slideshow for making fabric wall appliqués can be found at
USForacle.com.
Seeing spots
Maybe fabric-lined walls sound a little too hippie – or Hugh Hefner – for you. How about something that’s more Andy Warhol? For a pop art vibe, find an image you wouldn’t mind making wall-sized (and yes, it is cruel to select Freddy Krueger, even if it’d be hilarious to see your roommate squeal with terror each morning when he/she wakes up) and check out Homokaasu.org/rasterbator.
Like some sort of exercise in seeing the “big picture,” this free service blows up and rasterizes images, making them look like a mass of dots in varied sizes when viewed up close, only to take the shape of your photograph when you step away from it. It’s best to use a high contrast image, so if you’re not familiar with Photoshop, opt for something black and white. Upload your image onto the Web site, then crop and resize it according to the number of sheets of paper you’d like to use in making this creation. Once completed, you will receive a PDF file of the image, which you may print out and assemble on your wall.
Money-saving tip: This can use a lot of ink. If you head to the SG Computer Services lab in the basement of the Marshall Center, you can print up to 30 black-and-white pages, or 10 color pages, for free each day using your USF ID.
Put your accessories on display
Own an Hermés bag that costs more than your rent? Have a hat collection that’d make your suitemates cry themselves to sleep? Throw a frame around it and create your own fashion gallery (hey, it doubles as storage space).
First, decide how many items you want to feature, then lay them out on your walls – odd numbers tend to be most intriguing – determining how much space you’d need to hang each.
Use 3M Adhesive Wall Hooks – purchased at any Wal-Mart, Target or home improvement store – to hang up your prized fashions without putting any unnecessary holes in the wall. Voila! Time to microwave some crab puffs and mini quiches – your pseudo-gallery is ready for its reception.
If you have your own design ideas you’d like to share, visit the DIY décor forum at USForacle.com. There you can upload photos, find links to crafting Web sites and swap project tips and tricks.
More Stories
Meet the Team
Oracle EditorProfile

USF gives it away in Memphis 34-33
At the half, a 14-point lead meant USF was on track to win its first conference game in over a calendar year. That energy was kept up even with under five minutes to go when the Bulls were up 33-20. Then USF watched as its lead went from comfortable, to slim, to nonexistent in the […]

Club teams missing competition, friendship due to COVID-19
Under normal circumstances, Grant Nolder, president of the USF flag football team would be preparing for the club’s biggest competition of the year, the Swamp Bowl. The annual tournament, hosted at UF, typically takes place during the fall semester and features some of the best club flag football teams in the country. Winners of the […]

Bulls battle with ECU in OT win
Coach Brian Gregory said Tuesday the Bulls didn’t play complete, 40-minute games in their two losses last week. It’s debatable if they did Wednesday night against East Carolina (11-18, 5-11) at the Yuengling Center, but it was more than enough to put up a 73-68 overtime win. “It’s funny. There were stretches where we played […]

First SG scholarship rewards student leaders
Student Government (SG) launched the first-of-its-kind, merit-based scholarship to students Nov. 5 on USF’s Tampa campus. As a part of Student Body President Britney Deas and Student Body Vice President Travis McCloskey’s platform, Bull S.H.I.F.T., — Success, Health, Innovation, Finance and Tradition — the SG’s Student Leadership Scholarship consists of two merit-based scholarships which will […]

On-campus Jabil institute sparks anticipation from students
A plan drafted on a bar napkin two years ago has now become the USF Jabil Innovation Institute, a multi-million dollar institute combining the College of Engineering and the Muma College of Business. Senior Vice President of Advancement and CEO of the USF Foundation Joel Momberg and Jabil CEO Mark Mondello jotted the idea down […]